
As a California-based company, we know that the holiday season in most parts of our state tends to be missing one key ingredient of a quintessential winter wonderland: snow! Especially if you grew up in a place that had true white Christmases, it's hard not to long for the magic of sparkling snowfall when jingle bells start jingling.
But if you've got interior shutters, we've got a snowy craft you can make this holiday season to give your home–and the neighborhood–a very wintry vibe. This craft works best with larger-sized louvers, but if you have shutters with smaller louvers, you can check out this craft instead.
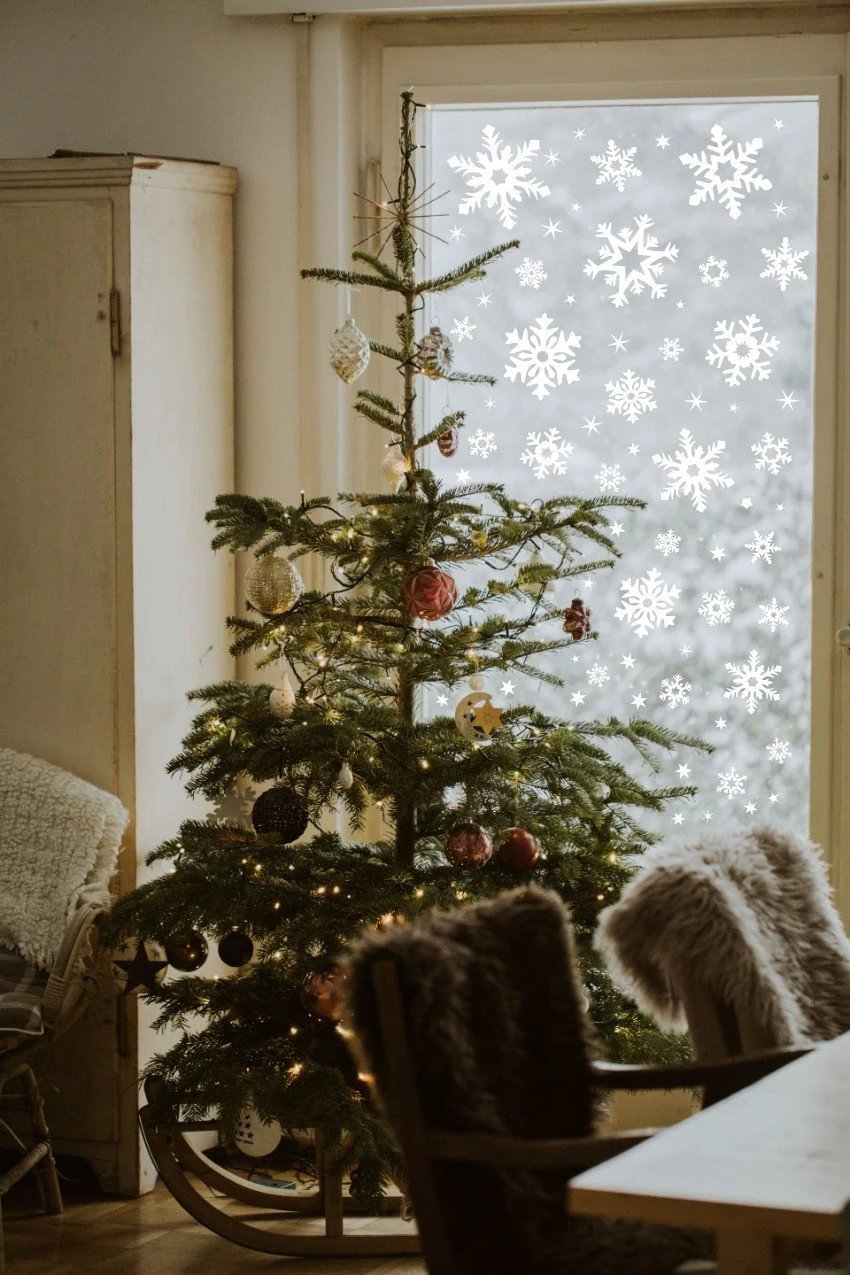
While many will festoon their roofs with lights and hang wreaths on their doors, we’ve dreamed up a window display craft perfectly suited for homes with interior shutters.
Drawing on the inspiration of window cling silhouettes but using the shutters to add depth and a little extra magic, this window shutter silhouette craft adds a subtle dash of whimsy to any holiday display.
Read on to learn how to create window shutter silhouettes of your favorite holiday scenes to delight your whole neighborhood this year.
Here's what you need for this craft:
- Ruler
- Paint-safe/wall-safe tape (preferably transparent, or white if you have white shutters)
- Scissors and/or X-Acto knife + cutting mat
- Lightweight black construction paper
- Printer
- Downloadable snowflake guide designs
- Fishing line, clear jewelry string, or white thread
- White pencil/pen or chalk
If you have a Cricut machine (lucky you!!), you can use:
Downloadable snowflake Cricut design SVG Option 1
- Downloadable snowflake Cricut design SVG Option 2
- Downloadable snowflake Cricut design SVG Option 3
- Cricut Design Space
- Fishing line, clear jewelry string, or white thread
- Scissors
- Ruler
- Paint-safe/wall-safe tape (preferably transparent, or white if you have white shutters)
- Good quality black cardstock paper (optional: get fancy with glitter cardstock)
- Cricut mat
- Cricut paper cutting blade + other Cricut tools like brayer and weeding tool
Skip to Cricut Instructions
How to Create Your Snowflakes:
Measure Your LouversFirst things first, you need to know what size snowflakes you're making ❄️ You want each snowflake to fit within the open space between your louvers when your shutters are open. Larger louvers have larger gaps, smaller louvers have narrower gaps. If you don't already know how wide your louvers are, use a ruler to measure the space between louvers when they're shifted open.
Download Your Snowflake GuideDownload one of the following files according to the measurements you took in Step 1:
Print Snowflake GuidePrint the pdf file you downloaded above on regular printer paper without changing any of the default page layout settings. We've already sized the designs for you, so you shouldn't have to worry about scaling anything.
Cut Out Snowflake GuidesEach file contains circle guides and 3 different snowflake designs with some slight variations in size. Using scissors, cut each guide out. Use an X-Acto knife if you have one if you want to add extra details or if some of the cuts are a little tricky with scissors. If you're working with just scissors, skip tinier cuts to make it easier when the time comes for cutting your actual snowflakes out.
Prep Your Paper
Choose a circle and its corresponding snowflake guide from your guides. Using a white pen, pencil, or chalk, trace the circle onto a blank sheet of lightweight black construction paper. Using your ruler, divide the circle into 12 sections like a clock. Your snowflake guide should fit into one of those sections. Position the guide into one of the sections and use a couple pieces of tape to hold it in place while you trace around the guide to transfer the snowflake design. Repeat, fitting as many circles onto one sheet of paper as you can, and for as many pieces of paper that you need in order to fill your windows with a flurry.
Divide the SnowflakesMake your first cuts by separating each circle from the page, cutting around the circumference of each one.
Fold Your SnowflakesFold your circle in half along the diameter, keeping the design facing out. Fold in half again, so that you have 1/4 of the circle with 3 sections showing on each side, with the design facing outward. Fold the design section behind the center section, and fold the blank section on the left over in front of the center section, like you're creating a small fan with a couple accordion folds. Flip it over so you're looking at the section with the design. Your circle should now be one small piece of pie. Repeat with the rest of your circles.
Cut Along Design GuideUsing scissors, cut along the contours of the design. Using an X-Acto knife on the folded circle could be difficult and/or hazardous, so save any internal cuts with an X-Acto knife for after you've unfolded the snowflake. After you've cut out your snowflake, unfold it and add any additional details you may desire with an X-Acto knife, remembering that symmetry is key! Repeat with the rest of your snowflakes.
Attach StringUsing scissors, cut a length of whatever you're using to hang your snowflakes (fishing line, jewelry string, thread, etc.). You want a little leeway for varying height with the different sized snowflakes you have and for tying knots, so give yourself a few more inches than you think you need. Attach one end to one of your snowflakes by tying it through an opening at the edge of the design or securing with a small piece of tape. Hold the snowflake up to the louver you're attaching it to on your shutters, and when you have it positioned just where you want it in the louver opening, secure the other end of the string to the louver with a piece of paint-safe/wall-safe tape. Repeat with your remaining snowflakes, varying their position horizontally along the louvers to create a snowfall effect.
Turn On the Lights and Let It Snow!As the sun goes down, turn on your interior lights, open your shutters, and step outside to marvel at your handiwork!
Optional Variation:
To make your snowflakes more magical inside and out, add glitter to them!
Cricut Instructions:
Measure Your LouversIf you don't already know how wide your louvers are, use a ruler to measure the space between louvers when they're shifted open.
Download SVG FilesDownload your free snowflake SVGs here:
Scale Design in Cricut Design SpaceDepending on the size of your louvers, scale your snowflake designs accordingly. If your louvers are 5.5", you want snowflakes that are at least a bit smaller than that. Feel free to experiment with different sizes: mix up 2" snowflakes with 4.5" snowflakes, etc.
Prep Your Cardstock and CricutUsing a high-quality black cardstock, attach a piece to your Cricut mat using a brayer to make sure it's properly attached. The quality of the cardstock is important with the Cricut because lower-quality paper may tear when cutting out more intricate designs. If it's not already in your Cricut, add your fine-point blade tool.
Do a Test RunRun a test with your Cricut on the "medium cardstock" setting with default pressure settings to see if you need to adjust anything for the type of paper you're using. If the design didn't cut all the way through, run it again. If the design has been cut all the way through, carefully remove your snowflake from the mat by pulling the mat away from the paper, using a weeding tool to carefully help lift any areas that are stuck. Use your weeding tool to push out any smaller sections of the design. If your cut is not clean or the paper ripped, change your Cricut Design Space settings to "cardstock for intricate cuts." If you have an Explore Air 2, you have to change your dial to "custom" to get that option. Adjust until you get a snowflake you're happy with!
Cut Your Snowflakes!Once you know which settings work best for your paper, cut away! Scale your designs up and down in size (staying at least a half inch smaller than your louver opening size) and do as many as you need to fill your windows with a flurry.
Follow Steps 9-10 AboveAttach your snowflakes to your louvers following the same steps above!
Optional Variation:
Use specialty Cricut glitter paper to make your snowflakes shimmer. (Adjust cutting settings accordingly.)
We hope this craft brings a little magic to your holiday season! Post pictures of your results on social media with the hashtag #ESHolidayShutters for a chance to get reposted on our channels. Follow us on Instagram, Facebook, and Pinterest.
Don't have interior shutters? Put them on your holiday wish list! It's easy to be your own Santa and get the beautiful custom interior shutters of your dreams in your home this holiday season with Elizabeth Shutters. Speak to a design consultant today to learn more. Call 925-255-7778 ☎️